
RTOS Systems (Part 3): ESP8266 Wi-Fi Web Server with Client Tracking
12 minute read
← Previous: Part 2: FreeRTOS LED Control with UART Menu
Next in Series → Part 4: STM32 + ESP8266 Integrated IoT LED Controller
This series covers RTOS systems development, progressing from bare-metal programming to integrated IoT systems.
- Part 1: Multi-Task LED Blinker Without RTOS
- Part 2: FreeRTOS LED Control with UART Menu
- Part 3: ESP8266 Wi-Fi Web Server (this post)
- Part 4: STM32 + ESP8266 Integrated IoT LED Controller
Project Overview
After mastering FreeRTOS on the STM32 in Part 2, I shifted focus to wireless communication by building a standalone ESP8266 web server. This project demonstrates RESTful APIs, responsive web design, and client tracking - all on a $3 Wi-Fi module!
GitHub Repository: esp8266-wifi-web-server
Hardware: ESP8266 NodeMCU (80 MHz Tensilica L106, 4MB Flash, 80KB RAM)
Purpose: This serves as the Wi-Fi bridge component that will later integrate with the STM32 in Part 4.
Web Interface
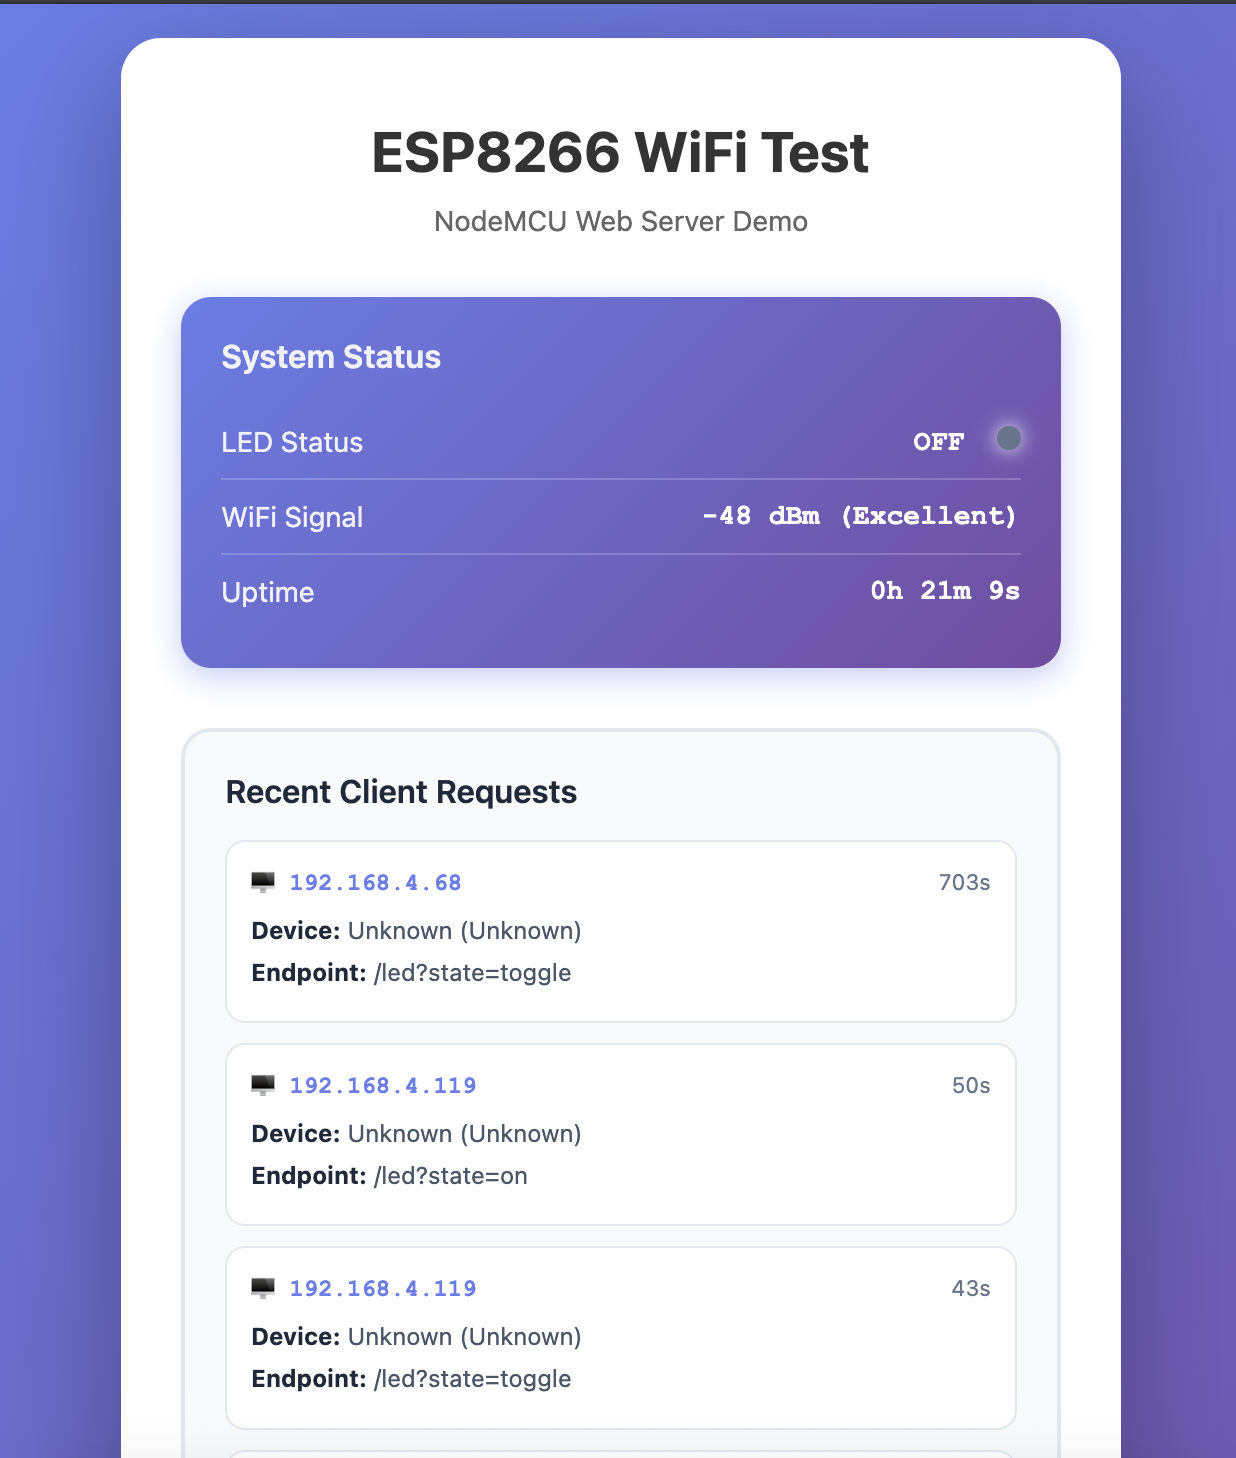 Part 1: System status and client tracking | 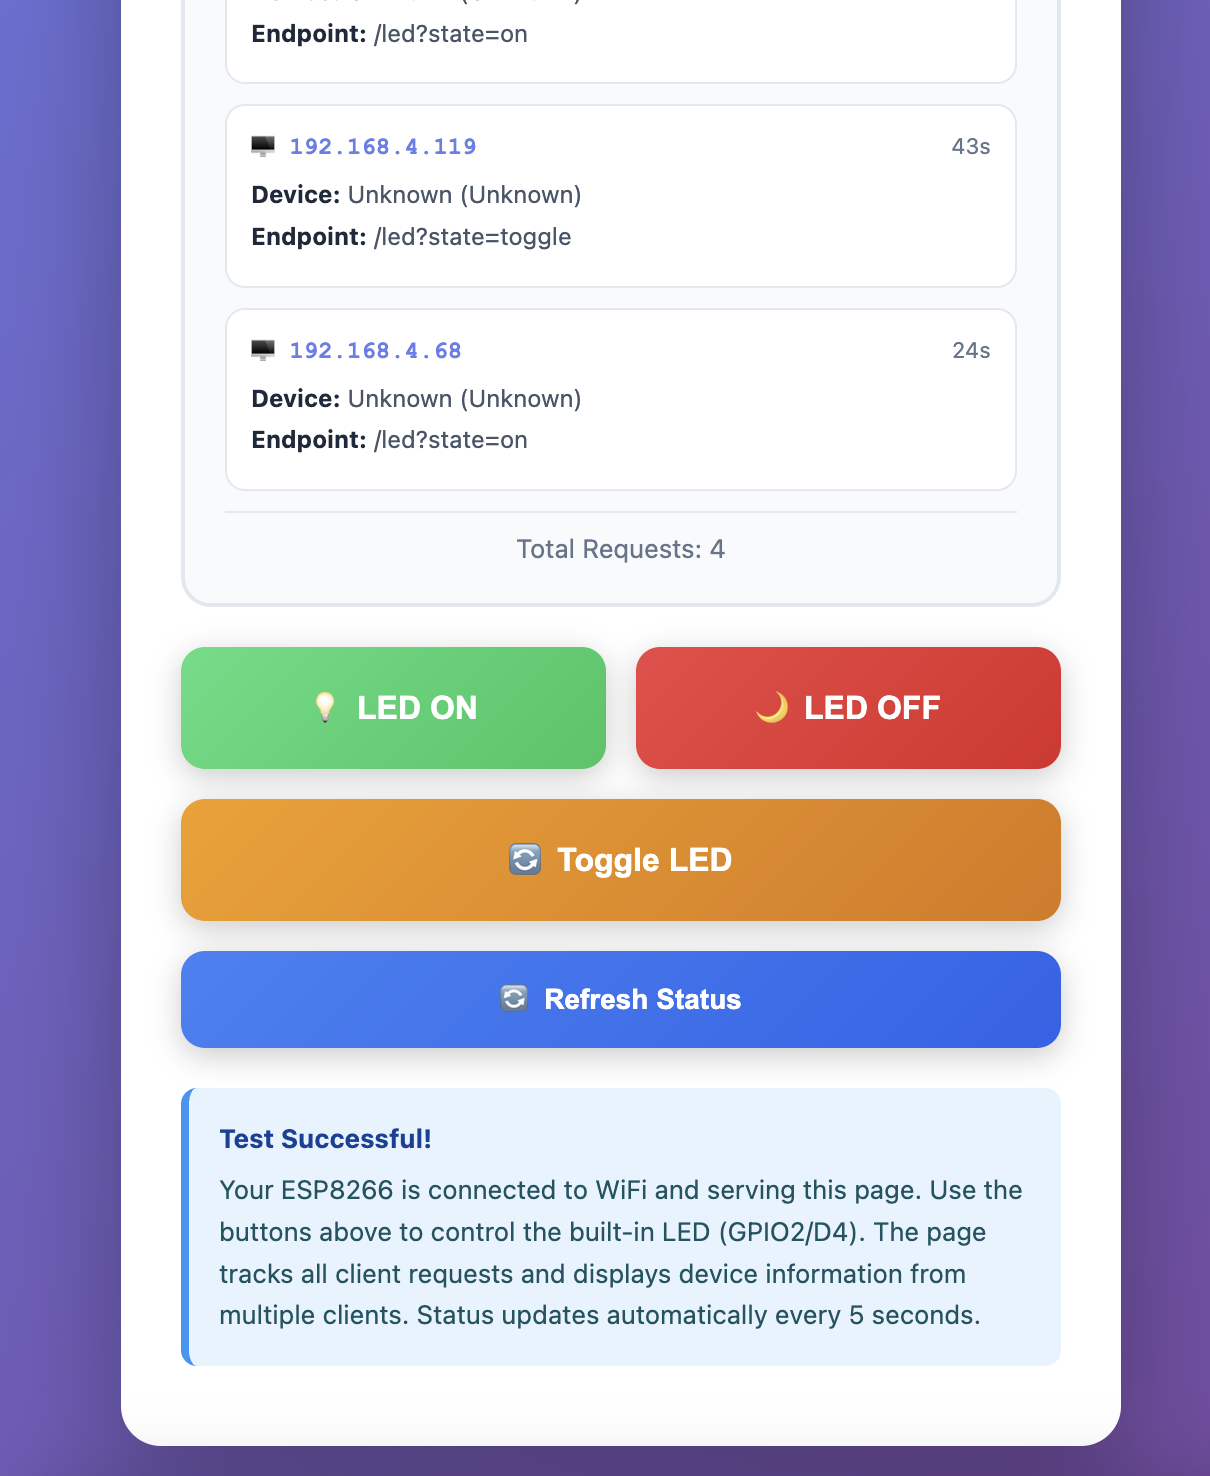 Part 2: Control buttons and info |
Why ESP8266?
The ESP8266 revolutionized IoT development when released in 2014:
- ✅ Built-in Wi-Fi - 802.11 b/g/n (2.4 GHz)
- ✅ Low cost - $2-4 per module
- ✅ Arduino-compatible - Easy to program with familiar IDE
- ✅ Sufficient performance - 80 MHz CPU, 80 KB RAM
- ✅ Large community - Thousands of libraries and examples
Perfect for: IoT gateways, sensor networks, home automation, wireless bridges.
Key Features
Web Server Capabilities:
- 📡 HTTP server on port 80 (RESTful API)
- 🌐 Responsive HTML interface (mobile-friendly)
- 🔖 mDNS support - Access via
esp8266-wifi.local - 📊 JSON endpoints for status and client data
- 🔄 Auto-refresh every 5 seconds (AJAX)
- 💾 Request history (circular buffer, last 10 requests)
- 📱 Device detection (iPhone, Android, Mac, Windows)
Client Tracking:
Recent Requests:
┌────────────────┬────────────┬──────────┬─────────────┐
│ IP Address     │ Device     │ Endpoint │ Timestamp   │
├────────────────┼────────────┼──────────┼─────────────┤
│ 192.168.1.105  │ iPhone     │ /led?... │ 15s ago     │
│ 192.168.1.110  │ Macintosh  │ /status  │ 42s ago     │
│ 192.168.1.52   │ Android    │ /clients │ 1m 23s ago  │
└────────────────┴────────────┴──────────┴─────────────┘
LED Control (Built-in GPIO2):
- ON / OFF / TOGGLE via REST API
- Demonstrates GPIO control fundamentals
- Foundation for STM32 integration in Part 4
System Architecture
High-Level Overview
┌─────────────────────────────────────────────────┐
│          CLIENT DEVICES (Multi-Device)          │
│   Laptop, iPhone, Tablet, Desktop, etc.        │
│                                                 │
│   HTTP GET /led?state=on                       │
│   HTTP GET /status (JSON)                      │
│   HTTP GET /clients (JSON)                     │
└────────────────────┬────────────────────────────┘
                     │ Wi-Fi 2.4 GHz
                     ↓
┌─────────────────────────────────────────────────┐
│         ESP8266 NodeMCU Web Server              │
│    esp8266-wifi.local (192.168.1.100 DHCP)     │
│                                                 │
│  ┌─────────────────────────────────────────┐   │
│  │      HTTP Request Handler               │   │
│  │  ┌──────┐  ┌──────┐  ┌────────┐        │   │
│  │  │  /   │  │ /led │  │/status │        │   │
│  │  │ Home │  │ Ctrl │  │ JSON   │        │   │
│  │  └──────┘  └──────┘  └────────┘        │   │
│  └─────────────────────────────────────────┘   │
│                     │                           │
│                     ↓                           │
│  ┌─────────────────────────────────────────┐   │
│  │     Client Tracking Module              │   │
│  │  • Extract IP (server.client().remoteIP)│   │
│  │  • Parse User-Agent header              │   │
│  │  • Detect device type & browser         │   │
│  │  • Store in circular buffer (10 slots)  │   │
│  │  • Log to Serial Monitor                │   │
│  └─────────────────────────────────────────┘   │
│                     │                           │
│                     ↓                           │
│  ┌─────────────────────────────────────────┐   │
│  │  Request History (Circular Buffer)      │   │
│  │  [IP|UA|Endpoint|Timestamp] × 10        │   │
│  └─────────────────────────────────────────┘   │
│                     │                           │
│                     ↓                           │
│  ┌─────────────────────────────────────────┐   │
│  │      GPIO Control (LED)                 │   │
│  │      GPIO2 (Active LOW)                 │   │
│  │      digitalWrite(2, LOW) = LED ON      │   │
│  └─────────────────────────────────────────┘   │
└─────────────────────────────────────────────────┘
RESTful API Endpoints
| Method | Endpoint | Parameters | Response | Description |
|---|---|---|---|---|
| GET | / | None | HTML | Serve responsive homepage |
| GET | /led | state=on/off/toggle | Plain text | Control built-in LED |
| GET | /status | None | JSON | System info (Wi-Fi, uptime, LED state) |
| GET | /clients | None | JSON | Request history with client metadata |
Example API Call:
# Turn LED ON (using mDNS)
curl http://esp8266-wifi.local/led?state=on
# Response: LED turned ON

# Get system status (using mDNS)
curl http://esp8266-wifi.local/status
# Response:
{
  "wifi": {
    "connected": true,
    "ssid": "MyWiFi",
    "ip": "192.168.1.100",
    "rssi": -45
  },
  "system": {
    "uptime": 3600,
    "freeHeap": 45000
  },
  "led": {
    "state": "ON"
  }
}

# Get client history (using mDNS)
curl http://esp8266-wifi.local/clients
# Response:
{
  "totalRequests": 42,
  "recentRequests": [
    {
      "ip": "192.168.1.105",
      "userAgent": "Mozilla/5.0 (iPhone...)",
      "endpoint": "/led?state=on",
      "timestamp": 125430
    }
  ]
}
Technical Implementation
Wi-Fi Connection
#include <ESP8266WiFi.h>

const char* WIFI_SSID = "YourNetworkName";
const char* WIFI_PASSWORD = "YourPassword";

void setup() {
  Serial.begin(115200);

  // Connect to Wi-Fi
  WiFi.mode(WIFI_STA);
  WiFi.begin(WIFI_SSID, WIFI_PASSWORD);

  Serial.print("Connecting to Wi-Fi");
  while (WiFi.status() != WL_CONNECTED) {
    delay(500);
    Serial.print(".");
  }

  Serial.println("\nWi-Fi Connected!");
  Serial.print("IP Address: ");
  Serial.println(WiFi.localIP());  // e.g., 192.168.1.100
  Serial.print("Signal Strength: ");
  Serial.print(WiFi.RSSI());
  Serial.println(" dBm");
}
Connection Output:
Connecting to Wi-Fi..........
Wi-Fi Connected!
IP Address: 192.168.1.100
Signal Strength: -42 dBm
HTTP Server Setup
#include <ESP8266WebServer.h>

ESP8266WebServer server(80);  // Port 80 (HTTP)

void setup() {
  // ... Wi-Fi connection ...

  // Register URL handlers
  server.on("/", HTTP_GET, handleRoot);
  server.on("/led", HTTP_GET, handleLED);
  server.on("/status", HTTP_GET, handleStatus);
  server.on("/clients", HTTP_GET, handleClients);
  server.onNotFound(handleNotFound);

  // Start server
  server.begin();
  Serial.println("HTTP server started on port 80");
}

void loop() {
  server.handleClient();  // Process HTTP requests
}
Client Tracking Module
Data Structure:
struct RequestLog {
  String ip;                 // Client IP address
  String endpoint;           // Requested URL
  unsigned long timestamp;   // millis() when request received
  String userAgent;          // User-Agent header
};

#define MAX_REQUESTS 10
RequestLog recentRequests[MAX_REQUESTS];
int requestIndex = 0;
unsigned long totalRequests = 0;
Logging Function:
void logRequest(String endpoint) {
  // Extract client IP from TCP connection
  String clientIP = server.client().remoteIP().toString();

  // Extract User-Agent HTTP header
  String userAgent = server.header("User-Agent");
  if (userAgent.length() == 0) {
    userAgent = "Unknown";
  }

  // Store in circular buffer
  recentRequests[requestIndex].ip = clientIP;
  recentRequests[requestIndex].endpoint = endpoint;
  recentRequests[requestIndex].timestamp = millis();
  recentRequests[requestIndex].userAgent = userAgent;

  // Increment with wrap-around
  requestIndex = (requestIndex + 1) % MAX_REQUESTS;
  totalRequests++;

  // Log to Serial Monitor
  Serial.println("───────────────────────────");
  Serial.print("Client IP: ");
  Serial.println(clientIP);
  Serial.print("Device: ");
  Serial.println(detectDevice(userAgent));
  Serial.print("Endpoint: ");
  Serial.println(endpoint);
  Serial.print("Total Requests: ");
  Serial.println(totalRequests);
  Serial.println("───────────────────────────");
}
Device Detection (User-Agent Parsing):
String detectDevice(String userAgent) {
  if (userAgent.indexOf("iPhone") >= 0) return "iPhone";
  if (userAgent.indexOf("iPad") >= 0) return "iPad";
  if (userAgent.indexOf("Android") >= 0) return "Android";
  if (userAgent.indexOf("Macintosh") >= 0) return "Mac";
  if (userAgent.indexOf("Windows") >= 0) return "Windows PC";
  if (userAgent.indexOf("Linux") >= 0) return "Linux";
  return "Unknown Device";
}
Example User-Agent Strings:
iPhone:  Mozilla/5.0 (iPhone; CPU iPhone OS 16_0 like Mac OS X) AppleWebKit/605.1.15
Android: Mozilla/5.0 (Linux; Android 12; SM-G991B) AppleWebKit/537.36
Mac:     Mozilla/5.0 (Macintosh; Intel Mac OS X 10_15_7) AppleWebKit/537.36
Windows: Mozilla/5.0 (Windows NT 10.0; Win64; x64) AppleWebKit/537.36
LED Control Handler
void handleLED() {
  if (!server.hasArg("state")) {
    server.send(400, "text/plain", "ERROR: Missing 'state' parameter");
    return;
  }

  String state = server.arg("state");

  if (state == "on") {
    digitalWrite(2, LOW);   // Active LOW - LED ON
    server.send(200, "text/plain", "LED turned ON");
  } else if (state == "off") {
    digitalWrite(2, HIGH);  // Active LOW - LED OFF
    server.send(200, "text/plain", "LED turned OFF");
  } else if (state == "toggle") {
    digitalWrite(2, !digitalRead(2));  // Toggle
    server.send(200, "text/plain", "LED toggled");
  } else {
    server.send(400, "text/plain", "ERROR: Invalid state (use on/off/toggle)");
  }

  logRequest("/led?state=" + state);
}
Responsive Web Interface
HTML stored in PROGMEM (Flash memory):
const char INDEX_HTML[] PROGMEM = R"rawliteral(
<!DOCTYPE html>
<html>
<head>
  <meta charset="UTF-8">
  <meta name="viewport" content="width=device-width, initial-scale=1.0">
  <title>ESP8266 LED Control</title>
  <style>
    body {
      font-family: Arial, sans-serif;
      max-width: 800px;
      margin: 50px auto;
      padding: 20px;
      background: linear-gradient(135deg, #667eea 0%, #764ba2 100%);
    }
    .card {
      background: white;
      padding: 30px;
      border-radius: 10px;
      box-shadow: 0 4px 6px rgba(0,0,0,0.1);
    }
    button {
      padding: 15px 30px;
      font-size: 16px;
      border: none;
      border-radius: 5px;
      cursor: pointer;
      margin: 10px;
    }
    .btn-on { background: #4CAF50; color: white; }
    .btn-off { background: #f44336; color: white; }
    .btn-toggle { background: #2196F3; color: white; }
  </style>
  <script>
    function controlLED(state) {
      fetch('/led?state=' + state)
        .then(response => response.text())
        .then(data => {
          document.getElementById('status').innerText = data;
          updateClients();
        });
    }

    function updateClients() {
      fetch('/clients')
        .then(response => response.json())
        .then(data => {
          // Update client table dynamically
        });
    }

    // Auto-refresh every 5 seconds
    setInterval(updateClients, 5000);
  </script>
</head>
<body>
  <div class="card">
    <h1>ESP8266 LED Control</h1>
    <div id="status"></div>
    <button class="btn-on" onclick="controlLED('on')">Turn ON</button>
    <button class="btn-off" onclick="controlLED('off')">Turn OFF</button>
    <button class="btn-toggle" onclick="controlLED('toggle')">Toggle</button>
  </div>
</body>
</html>
)rawliteral";

void handleRoot() {
  server.send_P(200, "text/html", INDEX_HTML);
}
Why PROGMEM?
- HTML stored in flash memory (4MB) instead of RAM (80KB)
- Saves ~3KB of precious RAM
send_P()reads directly from flash
Memory Usage
Flash (Code + HTML):
Sketch uses 295,000 bytes (28%) of program storage (1,044,464 bytes)
RAM (Heap):
Global variables use 27,872 bytes (34%) of dynamic memory (81,920 bytes)
Free heap during runtime: ~45 KB
Breakdown:
- ESP8266WebServer library: ~15 KB
- WiFi stack: ~8 KB
- Request history buffer: 10 × ~200 bytes = 2 KB
- HTML in flash (not counted in RAM): ~3 KB
Comparison to STM32:
| Resource | ESP8266 | STM32F407 |
|---|---|---|
| CPU | 80 MHz | 168 MHz |
| Flash | 4 MB | 1 MB |
| RAM | 80 KB | 192 KB |
| Cost | $3 | $15 |
Trade-off: ESP8266 has less RAM but more flash. Perfect for web server applications where HTML/CSS stored in flash!
Challenges Faced
1. Wi-Fi Connection Failures
Problem: ESP8266 failed to connect to 5 GHz Wi-Fi network.
Error:
Connecting to Wi-Fi..........................
Connection failed! Status: WL_NO_SSID_AVAIL
Root Cause: ESP8266 only supports 2.4 GHz (802.11 b/g/n), not 5 GHz (802.11 a/ac).
Solution:
- Switched router to 2.4 GHz mode
- Or used dual-band router with separate 2.4 GHz SSID
Lesson: Always check ESP8266 Wi-Fi specifications before deployment!
2. Watchdog Timer Resets
Problem: ESP8266 rebooted randomly with this error:
Soft WDT reset

Fatal exception (9):
epc1=0x40000f68, epc2=0x00000000, epc3=0x00000000
>>>stack>>>
Root Cause: Blocking delay in loop() caused watchdog timeout:
// BAD CODE (causes WDT reset)
void loop() {
  server.handleClient();
  delay(10000);  // 10 second delay blocks watchdog feed!
}
ESP8266 has a software watchdog timer (WDT) that resets the chip if not fed within ~3 seconds.
Solution: Use yield() or delay() < 1 second in loop():
// GOOD CODE
void loop() {
  server.handleClient();  // Calls yield() internally
  delay(10);              // Short delay OK
}
Alternative: Explicitly feed watchdog:
ESP.wdtFeed(); // Reset watchdog timer
3. Heap Fragmentation Crashes
Problem: After ~2 hours of operation, ESP8266 crashed with:
Exception (28):
epc1=0x4000bf64 epc2=0x00000000
Decoding stack results
0x4000bf64: malloc in ...
Root Cause: Dynamic String concatenation caused heap fragmentation:
// BAD CODE (causes fragmentation)
String html = "";
for (int i = 0; i < 100; i++) {
  html += "<tr><td>" + data[i] + "</td></tr>";  // Many allocations!
}
Each += operation allocates new memory, leading to fragmentation.
Solution: Pre-allocate buffer size:
// GOOD CODE
String html;
html.reserve(5000);  // Pre-allocate 5KB
for (int i = 0; i < 100; i++) {
  html += "<tr><td>" + data[i] + "</td></tr>";
}
Or use snprintf() with char arrays:
char html[5000];
int len = 0;
for (int i = 0; i < 100; i++) {
  len += snprintf(html + len, sizeof(html) - len,
                  "<tr><td>%s</td></tr>", data[i]);
}
Result: System ran for 24+ hours without crashes.
Serial Monitor Output
========================================
  ESP8266 LED Control Web Server
========================================
Connecting to Wi-Fi..........
Wi-Fi Connected!
IP Address: 192.168.1.100
MAC Address: 5C:CF:7F:AB:CD:EF
Signal: -42 dBm
HTTP server started on port 80
========================================

───────────────────────────
Client IP: 192.168.1.105
Device: iPhone
Endpoint: /led?state=on
Total Requests: 1
───────────────────────────

───────────────────────────
Client IP: 192.168.1.110
Device: Mac
Endpoint: /status
Total Requests: 2
───────────────────────────

───────────────────────────
Client IP: 192.168.1.105
Device: iPhone
Endpoint: /clients
Total Requests: 3
───────────────────────────
What I Learned
ESP8266 Strengths:
- ✅ Built-in Wi-Fi - No external modules needed
- ✅ Arduino-compatible - Easy to program
- ✅ Low cost - $2-4 per board
- ✅ Large flash - 4MB perfect for storing HTML/CSS
- ✅ Rich libraries - ESP8266WebServer, WiFi, mDNS (
.localhostnames), OTA, etc.
ESP8266 Limitations:
- ⚠️ Limited RAM - Only 80KB (vs. 192KB on STM32)
- ⚠️ Watchdog timer - Must feed every ~3 seconds
- ⚠️ No FreeRTOS - Single-threaded, cooperative multitasking
- ⚠️ 2.4 GHz only - Can’t use 5 GHz Wi-Fi
- ⚠️ Heap fragmentation - String operations need care
Key Takeaway: ESP8266 excels at simple web servers and Wi-Fi bridging, but lacks the multitasking and real-time capabilities of STM32 + FreeRTOS. The ideal solution? Use both together!
Next Steps
In Part 4, I integrate this ESP8266 web server with the STM32 FreeRTOS system from Part 2:
Architecture:
[Mobile Browser] → Wi-Fi → [ESP8266 Web Server] → UART → [STM32 FreeRTOS] → LEDs
New Challenges:
- UART protocol between ESP8266 and STM32
- Bidirectional PING/PONG health monitoring
- Collision prevention (both devices send PINGs)
- ACK tracking (web page shows STM32 acknowledgments)
- Error handling and retry logic
The result is a complete IoT LED controller demonstrating embedded systems integration!
Code Repository
Full source code: github.com/sharan-naribole/esp8266-wifi-web-server
Files:
ESP8266_Basic_WiFi_Connect.ino- Main Arduino sketchindex.h- HTML/CSS/JavaScript web interfacedocs/- Screenshots and documentationREADME.md- Setup instructions and API docs
← Previous: Part 2: FreeRTOS LED Control with UART Menu
Next in Series → Part 4: STM32 + ESP8266 Integrated IoT LED Controller